About the BabyLogger
Overview of the BabyLogger
The BabyLogger is a device used by researchers to record the child’s interactions in a secure way and to extract the audio and actimetric information.
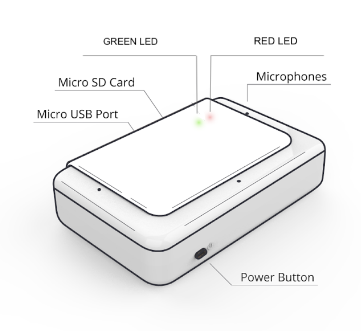
Components
The following pictures shows the main components of the baby logger:
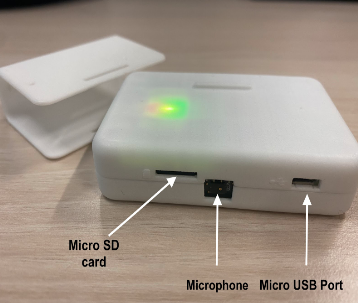

Inserting and removing the SD card in the BabyLogger
Remove the cover and insert or remove the SD card from the top of the Logger. Caution: it is a tiny card and it may spring out. Be careful not to lose it.
BabyLogger microphones and channels
Technical specifications
- Audio recorder : 4 channels, 16kHz sampling rate, 16bits.
- Actimeter : xzy gyroscope, and xyz accelerometer, 100Hz sampling rate.
- Dimensions : L: 7,5cms, H: 4,7cms (5cms with cover), D: 1,5cms (1,9cms with cover).
- Weight : 200g.
- Millisecond time stamping.
- Capacity : 62 hours / 124 hours (for 32GB / 63GB SD card storage).
- Autonomy : 24h.
- Charging time : 2-3 hours (on a 5v 1-2A USB charger).
How to use the BabyLogger
The BabyLogger is very simple to use. It has a single button used to power on the logger (short press) and to turn it off (long press). The different states of the BabyLogger are indicated via two LEDs: GREEN and RED (for LED states see Step 1).
The device consists of two parts: a main body and a cover. Removing the cover allows for access to the SD card, and power plug (micro USB).
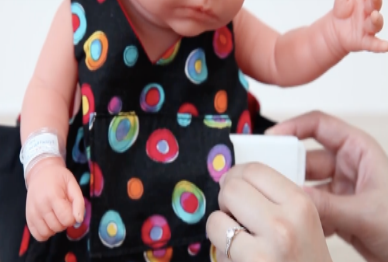
To use the BabyLogger for recording, ensure the cover is on before inserting the logger into the chest pocket of the participant with the microphone on the top of the logger facing up and the other three microphones facing out as shown in figure 2.
The BabyLogger has a 24 hour continuous recording capacity (for both battery and data). After each recording session, you’ll have to transfer the data to your computer through the SD card, delete all files on the SD card, and recharge your BabyLogger.
Different steps to explain how to use the BabyLogger.
Step 1. Starting the Babylogger
- Press briefly on the power button.
-
Internal checks:
- Immediately after powering on the device will go through a series of internal checks (battery, SD card) that will take a few seconds.
-
The device is ready for use if:
- the GREEN LED is lit and if the RED LED blinks continuously: you have less than 15% of the battery (less than 4h of recording).
- the GREEN LED blinks once, then remains lit: less than 50% of the battery.
- the GREEN LED blinks twice, then remains lit: less than 75% of the battery
- the GREEN LED blinks 3x, hen remains lit: more than 75% of the battery.
-
The device is not ready for use if:
- After powering on, neither of the 2 LEDs are ON: the battery is critically low and needs to be charged immediately.
- During recording, the RED LED blinks 3 times and stops: the battery is very low. You have to charge it.
- After powering on, the GREEN LED is ON and turns OFF after a few seconds: there is a problem with the SD card (unplugged, corrupted or full). Check whether the SD card is present. If present, transfer the files to a computer and remove the files (see Step 4). If the problem is not solved, you will have to reformat the two partitions of the card. If the problem persists, try to change the SD card see this section to replace the SD card).
Step 2. Recording
With the GREEN LED LED continuously lit, the BabyLogger is now in the recording phase if the ( RED LED is blinking, it shows that the battery is low).
Insert the BabyLogger in the chest pocket with the top of the cover facing up, and the three microphones in the front facing out.
Step 3. Turning off the logger
Turn off the BabyLogger by pressing the power button (long press, 3 seconds). All LEDs should be off.
Step 4. Transferring recordings
-
- Remove the cover and push the SD card out. Be careful: the SD card may shoot out of the slot and can be easily lost – it is tiny.
-
- Put the SD card in a MicroSD adaptor and plug it into the computer.
-
- Boot your computer(for software installation see here), drag and drop the files from both partitions on the MicroSD (BL_MOTION and BL_AUDIO) into the Raw_Data folder on your computer.
WARNING
Be careful, if using more than one logger, transfer and decrypt the first logger’s raw files before transferring the second logger’s raw files. All loggers use the same file name pattern, therefore you will overwrite the first logger’s raw files if they are not decrypted before transferring files from the second logger.
Step 5. Decrypting the recordings
To decrypt the files, follow the decrypt process.
Step 6. Charging the logger
Remove the logger’s cover. Plug the micro USB end of the charging cord into the logger’s Micro USB port. Plug the USB end into any computer USB port or phone charger with a USB port. To avoid damaging the battery, make sure the voltage of the charger is no higher than 5V. For a normal charging time, ensure the current capacity is between 1A and 2A.
NOTE: You can use a USB/ Micro-USB cable to charge the Logger with any standard charger (or computer).
The GREEN and RED LEDs blink steadily while the logger is charging. Once the device is fully charged, both LEDs will turn off. The device will turn itself off automatically. The logger takes 2-3 hours to fully charge.
WARNING
- While the logger is charging, it is not possible to record.
- Once the logger has been fully charged, the device must be used at least once before it will be able to charge again. This is for power saving purposes designed to prevent the logger from draining portable external batteries.
- To avoid losing data, we strongly recommend following step 1 to step 5 through fully, without skipping any steps. Most importantly, remember to fully transfer the data and recharge the logger after each recording session.
Setting Up
Time Synchronization
A phone application has been developed to allow you to synchronize the date and time of the BabyLogger depending on your time zone.
Instructions:
-
What is needed: a phone application (Android only) :
-
The process :
- Power on the bluetooth of your phone.
- In order to modify the date and time on the BabyLogger, you need to charge the logger AND be connected to the phone application via the bluetooth of the logger.
- Pair the phone with the logger bluetooth. The name is “BabyLogger” and password “123456”. You have 10 minutes to update the time. If the process is not completed during that time, you will have to start over.
- Once the logger is connected to your phone, the LED of the logger will change from RED (charging mode) to GREEN /RED .
- Open the application and click on the Update Time button.
- Now, the LED will switch to RED only, which means that the Baby Logger has correctly synchronized with your Timezone.
Note: you should synchronize the time of your logger, right after receiving it, and every time that it has been powered off for several weeks. This video will show you the process to synchronize the date and time of the BabyLogger.
SD Card
Creating a partition on a SD card
With the 64GB SD card, create two partitions with the first one containing 95% of the memory area and the second one 5%. The card should be formatted in the NTFS File System, and the partitions should be created in a fixed order (audio first, accelerometer second). The table below gives the names and sizes of the partitions that should be created according to your SD card size.
| Partition | Name of partition | partition_size | partition_type | size_unity_allocation |
|---|---|---|---|---|
| Partition 1 | BL_AUDIO | 60.8GB | EXFAT | 64Ko |
| Partition 2 | BL_MOTION | 3.2GB | FAT32 | 32Ko |
You can have more details on the process by clicking on the following links: - Windows - Linux - MacOs
This tutorial will show you how we partitioned the SD card on a Windows computer.
Decrypting the Data
All data recorded with the BabyLogger are encrypted for data protection. If the logger is lost, nobody except for the registered user will be able to decrypt the data. For that reason, do not share with anyone the downloaded software as well as the security key folder. This is a Tutorial to explain how to decrypt data on MacOs. For Windows or Linux systems, the same process applies.
NOTE: Make sure your computer has the proper protection (antivirus, hard drive encryption, password logins) as you are responsible for the protection of the data collected with the Logger.
Download the BabyLogger software
- Download the BabyLogger’s software package corresponding to your computer’s operating system (links and password sent via email).
- Enter the password to unzip the folder OSname_babylogger_decrypt. . This step will create a BabyLogger folder.
- Inside the folder, there is an executable file to launch the decryption process and three subfolders:
- Raw_Data : contains temporary files for transfer.
- Decrypted_Data: contains the decrypted files.
- Key: contains the keys associated with your logger. DON’T CHANGE THE KEY FOLDER CONTENT
How to decrypt the BabyLogger data?
-
Copy the data from the SD card into the “Raw_Data” folder. If you’d like to make a backup of the encrypted data, copy them also in the backup fodler of your computer. Then delete the data from the SD card so that you could start a new recording session with the Logger.
-
Launch the decryption process by choosing one of these 2 options: A) Double-click on the babylogger_OSname app icon to launch the decryption process. B) Open a command prompt and navigate to the Osname_babylogger_decrypt folde. Then run the following command: ./babylogger_OSname. If you encounter any problem, see the FAQ section.
-
The decryption process creates the audio (.wav) and accelerometer files in the “Decrypt_Data” folder. Once the decryption process is completed, copy the files to your backup folder. Each file should have a unique name (LoggerID and date).
-
Delete all files in the Raw_data folder.
-
Delete all files from both partitions of the MicroSD if it hasn’t been done yet.
WARNING: . Be careful, if you recorded with several loggers, transfer and decrypt one logger at a time. Repeat the steps described above for each logger.
The decrypted files
The decrypted files can be found in the Decrypt_Data folder. You will find three types of files :
- Audio files (XX-Audio.wav): they are the decrypted audio files recorded with frequency of 16kz, 16 bits and 4 channels. Their duration is no longer than 30mins long.
- Audio file example:
0002-20200115-20_40_07-Audio.wav
- Audio file example:
- Actimetry files (XX-Acti.txt): they contain the accelerometer and gyroscope information.
- Actimetry file example:
0002-20200115-20_40_07-Acti.txt
- Actimetry file example:
- Meta data files (XX-Data.txt): they contain the recording information (number of buffers, timestamps…)
- Meta data file example:
0002-20200115-20_40_07-Data.txt
- Meta data file example:
Automatic Data Processing
This section describes the steps to send the collected data to the server and to process them. To transfer the files data to the server, we use the FileZilla software as a solution. FileZilla may be used for secure file transfer using SFTP or FTPS between clients and server. You can follow the steps below or watch his tutorial.
Transferring the files to the Cloud using FileZilla
-
Installation
You can download the filezilla software here according to your operating system.
-
Setting up a Server Connection
- Start FileZilla by clicking on the FileZilla icon.
- From the File menu, select ‘Site Manager’.
- Click New Site
- Enter the following:
- In the Host box, enter the address of the server you’re connecting to
129.199.81.135. - Click the arrow in the ‘Server Type’ box, and then:
- For FTPS transfers, select ‘FTP over SSL’ (explicit encryption).
- In the ‘Logontype’ box, check ‘Normal’.
- In the ‘User’ box, enter the username you were assigned for this server (and received via email)
- Click the ‘Don’t save password’ box.
- In the Host box, enter the address of the server you’re connecting to
- Click Save and Exit. The next time you open FileZilla, you can connect directly to this server using the options you chose. For instructions, see Transfer Files Using FileZilla below.
- Transferring the files Using
- Start FileZilla.
- Click the arrow next to the ‘Open Site Manager’ button, and then select the server you set up in the previous procedure.
- In Address box, enter the server Ip address which is :
129.199.81.135. On the Username and Password boxes, enter the information you received via email and then click OK. - YOu will now see your computer (Local Site) is on the left and the server (Remote Site) is on the right. Navigate to the different locations on both sites.
- Create on your local computer a folder name
Data_to_processand copy all the data files you want to process. If the data are from the BabyLogger, you have 2 options: you can either send the decrypted files on theDecrypted_Datafolder or the encrypted files on theRaw_Datafolder. - Drag and drop this folder to the server site (Right part).
Data processing
Here are the different algorithms used to process the data sent to our server.
- Pyannote An open-source toolkit written in Python for speaker diarization. Pyannote allows the following tasks:
- Voice Activity Detection (VAD) is the task of detecting speech regionsin a given audio stream or recording. The ouput for this in the rttm file is SPEECH. To this label, is associated the onset and the duration.
- Speaker change detection is the task of detecting speaker change points in a given audio stream or recording. Currently, the labels we output are: KCHI (key child), CH (other children), MAL (male adult.s), FEM (female adult.s).
Note that for the last 3 categories, speakers of the same type are aggregated. For example, we don’t make the distinction if there are 3 distinct female speakers. They are all labelled under FEM.
Here’s a sample output of the rttm file using the Pyannote algorithm:
- SPEAKER FEM_MA_speech_test_3_16000Hz_16bit_mono 1 1.011 4.506 SPEECH
- SPEAKER FEM_MA_speech_test_3_16000Hz_16bit_mono 1 1.014 4.475 MAL
- ALICE
An open-source and language-independent tool for automatic measurement of phoneme, syllable, and word counts. ALICE allows the following measurements:
- Count of total phones/phonemes per file,
- Count of total syllables per file,
- Count of total words per file.
Here’s a sample output using the ALICE algorithm:
- FileID phonemes syllables words.
- FEM_speech_test_2_16000Hz_16bit_mono 227 111 72.
- MA_speech_test_1_16000Hz_16bit_mono 239 118 79.
References:
- Bredin, H., Yin, R., Coria, J. M., Gelly, G., Korshunov, P., Lavechin, M., Fustes, D., Titeux, H., Bouaziz, W. and Gill, M.-P. (2020). pyannote.audio: neural building blocks for speaker diarization. In International Conference on Acoustics, Speech, and Signal Processing (ICASSP) 2020.
- Lavechin, M., Bousbib, R., Bredin, H., Dupoux, E., & Cristia, A. (submitted). An open-source voice type classifier for child-centered daylong recordings. Submitted to Interspeech-2020, October 25–29, Shanghai, China. Online arXiv pre-print: https://arxiv.org/pdf/2005.12656.pdf
- Räsänen O, Seshadri S, Lavechin M, Cristia A, Casillas M. ALICE: An open-source tool for automatic measurement of phoneme, syllable, and word counts from child-centered daylong recordings. Behav Res Methods. 2020 Sep 1. doi: 10.3758/s13428-020-01460-x. Epub ahead of print. PMID: 32875399.
Downloading the results
When the processing is completed, you will receive an email notification to download the results. You can watch this video for more details tutorial or follow the steps below.
- Open the FileZilla software and connect to the remote site following the same procedure as above.
- On the right section (Remote server) you will find a folder with the decrypted data if you sent encrypted data of the BabyLogger. In all cases, you will find the outputs of the algorithms in the
output_resultsfolder.
Frequently Asked Questions
Problem launching the decrypt software.
If you use MacOS, the first time when you double-click on BabyLogger, a window like the following may appear:
To resolve this problem, you have 2 options:
-
Authorize this application in the Security & Privacy tab of System Preferences and try again.
-
Use the terminal:
- Open a terminal: Ctrl+cmd+T (Linux), by searching for terminal (MacOS) or type cmd (Windows).
- Go to the path where to find the installed MacOS_babylogger_decrypt folder for example.
- Type the following command on a terminal: ./babylogger_OSname (for Linux and MacOS) and babylogger_windows.exe (for Windows).
If you use Windows, if you have a warning (see the picture below) when you double click the Windows_babylogger_decrypt app, click on Run anyway.
Problems in decrypting the files.
The decryption software is tuned to the particular loggers that you have ordered. This is for data protection. If a logger is lost, nobody except the registered user will be able to decrypt the data. It also means that you should not distribute the software that you have downloaded. It contains a set of keys dedicated for your specific loggers. The keys are in the directory keys/ and you should not change or remove anything in this directory.
If you encounter a problem, re-download the software and make sure that you are using the correct set of loggers (the logger IDs appear in the audio, meta data and accelerometer files).
Problem with decryption process on Windows
On Windows , if you have a warning (see the picture below) when you double click the Windows_babylogger_decrypt app, click on Run anyway.
Warnings during file decryption process.
The decryption process runs a check on data integrity. In case of warnings, it means that part of the audio is missing, which could be due to problems with the hardware (the Logger or the SD Card).
Data volume and synchronization software.
WARNING
-
The logger files are large and will take up lots of hard drive space (around 60% more than the size of the SD Card in use). For example, for a 64GB storage on the SD card, 100GB will be required on the hard drive. f you are using an automatic synchronization on the cloud (icloud, dropbox, etc), be careful to exclude the Logger directories from automatic backup! This may slow down everything and saturate your storage allocation.
-
If you use a MacOS and you synchronyze the MacOS storage with the icloud, make sure that when you copy the files onto the ‘Raw_Data’ folder, these stay on your own device (local storage) and are not synced with the icloud. In the following example, it means that the file is in the icloud and not on the local device.
-
If that happens, delete the files and re-copy them. They should be this time on your local device, and make sure that no cloud logo exist like in the previous picture.
Problems with the SD card
If you use Linux and while copying the files from the SD card, you encounter issues with the SD Card format, type the following commands:
- `sudo add-apt-repository universe`
- `sudo apt update`
- `sudo apt install exfat-fuse exfat-utils`
Contact Information
Phone : +33 6 52 20 64 18 Address : 2 Rue Simone iff - 75012 Paris, France Contact Us : For technical questions and support or if you’d like to give us feedback: contact@echolalia.org